Large Branch Removal - Japanese Maple

n8

Chumono
Messages
528
Reaction score
1,376
Location
Central Sacramento Valley
USDA Zone
9a
Picked up this Japanese maple from a guy's yard two years ago. He was selling all of his projects to move to Louisiana, so I bought a couple in pots and he invited me back to dig up whatever I wanted from his yard because his wife (ex-wife?) didn't want them around after he left. It was kind of a weird situation that was never explained fully, but nice enough people. This and two other pretty large maples were free for the digging.

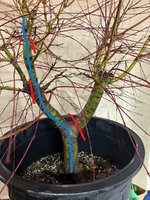
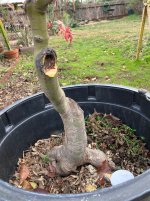
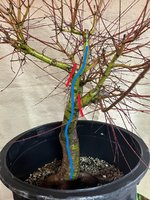
Sat on this for two years thinking I would develop with two trunks at the split and ultimately decided that one trunk was far too thick and boring, while the other has movement and interest. Using @markyscott's Ebihara post and @Adair M's pictures as a guide, I went to work on it this morning. First pic is the front and the other's are from the sides. The biggest cut here will be on the rear of the tree.
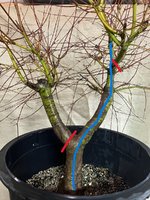
IMG_1918.jpg IMG_1917.jpg IMG_1919.jpg

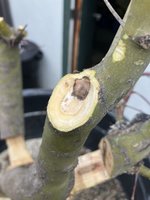
We are removing the big trunk/branch, plus two other awkward branches. Cut wedges in the two large branches for removal next year and removed the right angle branch at the top of the tree altogether because it was much smaller and should heal quickly. After sawing and using a chisel, I used a Dremel to make the big cuts slightly concave, then cleaned up the edges with a razor. I'll ultimately strip this whole trunk down and use new branches to rebuild.
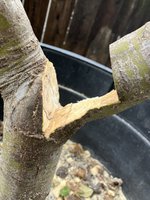
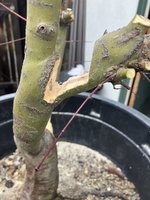
IMG_1921.jpg IMG_1922.jpg IMG_1924.jpg

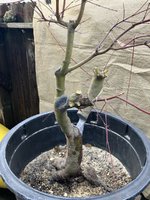
Sealed up and ready to heal. Thinking about also repotting into a box with better soil when buds start moving. I think I can pull it off. Nebari will also need some grafts at some point, so I guess I'll start more Japanese maple seedlings this year. I think this has potential.
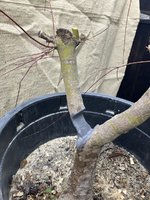
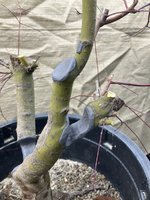
IMG_1927.jpg IMG_1928.jpg IMG_1929.jpg
 
Nice proyect, I wish you good luck.

I woudn't disturb so much the root ball this year. Too many "interventions" in the same season not is the best practice IMHO.
Anyway I think you can enjoy this video for some "inspiration"

Cheers!
 
  • Like
Reactions: n8
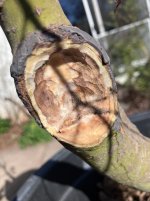
Removed the large branch and stub today. You can see the large calluses here:

IMG_3517.jpg IMG_3514.jpg

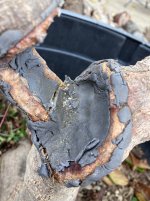
Then I cleaned up the cuts where the branch stubs were growing from. Looking a little dark in there but I reckon that's mostly discoloration from water being trapped under the cut paste. If you thing I should Dremel that out a little cleaner, let me know.

IMG_3518.jpg IMG_3519.jpg

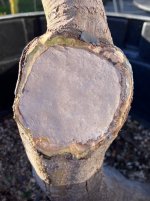
Here is most of the trunk I will be keeping when these heal over, which I do not expect to take more than a couple years. Applied more cut paste over these wounds and will put this in a flat when buds push. This pot is too big to move around and I got caught last summer when the tree was in too much sun.

IMG_3520.jpg
 
The "dark in there" is rotting wood so probably best to clean that out and sterilize it and stop the rot from progressing.
 
What is the best way or product to "sterilize" when cleaning out old wounds and hollows? Lime sulphur? Ever add wood hardener in there?

Cleaning out, filling and sealing wounds is an all too common task over here but still not sure I've fully cracked it.
 
I use lime sulphur in old wounds to prevent the wood from rotting before the callus heals over.
Wood hardener can also be used.
In this case, the wound appears hollow. New callus needs a fairly flat base to grow over which is probably the reason for recommending epoxy to fill it up a bit and make it easier for the callus to grow over. Scrape/carve back to hard wood and sterilise before filling to reduce chances of any rot starting up under the filler. The closer shots appear to show the previous cut mark at the base of the wound? That may mean the hollow appearance is just excess callus building up around the wound. If it's just the photos making that wound look deeper than it is you won't need any filler. Just reseal and cross fingers.
 
Thanks, @River's Edge, @caffeinated and @Shibui. It didn't dawn on me that it could be rot. It looked much better (lighter in color) Saturday afternoon and I was not overly concerned, but always game to learn and try new things. Today, I carved out, cleaned, and filled in the cut. This is what it looked like when I peeled off the new cut paste applied two days ago:

IMG_3527.jpg IMG_3528.jpg

After carving out the surface rot. (I went a back in to carve out a bit more after these photos.)

IMG_3529.jpg IMG_3530.jpg

Applied lime sulfur and let it dry for a few hours. Then I filled in the cuts with epoxy (JB Weld Quikwood).

IMG_3532.jpg IMG_3533.jpg

Cleaned the calluses up with a razor and applied new cut paste:

IMG_3534.jpg IMG_3535.jpg
 
Thanks, @River's Edge, @caffeinated and @Shibui. It didn't dawn on me that it could be rot. It looked much better (lighter in color) Saturday afternoon and I was not overly concerned, but always game to learn and try new things. Today, I carved out, cleaned, and filled in the cut. This is what it looked like when I peeled off the new cut paste applied two days ago:

View attachment 581353 View attachment 581356

After carving out the surface rot. (I went a back in to carve out a bit more after these photos.)

View attachment 581355 View attachment 581354

Applied lime sulfur and let it dry for a few hours. Then I filled in the cuts with epoxy (JB Weld Quikwood).

View attachment 581360 View attachment 581359

Cleaned the calluses up with a razor and applied new cut paste:

View attachment 581357 View attachment 581358
Sometime down the road you may wish to refine the scar and trim the collar for shape. I would allow the cut to heal and then consider what adjustments you may wish in a few years. Nice beginning.
 
  • Like
Reactions: n8
Back
Top Bottom