Ideas for Stewartia Monodelpha

dbonsaiw

Masterpiece
Messages
2,431
Reaction score
3,111
Location
New York
USDA Zone
7b
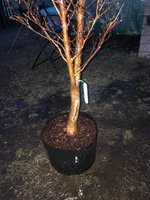
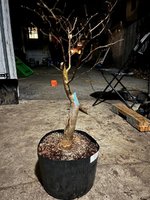
Found this tree on Green Thumb and could not resist. Truly a unique and beautiful species. I was so carried away with this being the last Stewartia he had that I didn't even think about what I wanted to do with it. It has kind of a "Y" shape that I'm not sure what to do with. Remove one of the larger branches? Leave it be? Layer to bring the split closer to the soil? Chop it below the split? Any ideas would be appreciated.

Also, I read up on the other Stewartia threads here and there is little info out there on how to care for these. Some of the links that seemed promising were broken. If anyone can point me to Stewartia literature it would be much appreciated.

What I know is they are acid-loving (friggin hippies) and like water during the growing season. They back bud very well and heal in a sort of wonky way when trunk chopped. I find the growth pattern of the branches to be great even without any wiring.

As an aside, with all the fly-by-night bonsai sellers out there, it is great dealing with John at Green Thumb. I highly recommend.
 

Attachments

  • Stewartia.jpg
    Stewartia.jpg
    256.7 KB · Views: 416
I was at his place tonight.

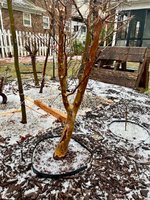
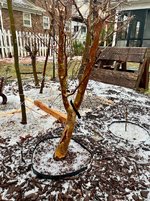
As for your tree, I'd consider removing the large straight trunk at the back and turning it about 30-60ºCW (or 180º from that).
 
Assuming the base is good from the front shown in this photograph, I would make 2 cuts:
30311A97-7C57-4B95-83B7-BB49C89CADFD.jpeg
Most Stewartia you see have a single central trunk, so I would try to follow that tendency. Plant it in a shallow wood box in the spring, arranging the roots radially, and let it grow this year. I use akadama, some use kanuma. They are thirsty trees, so use what you need to get you through a day. I found keeping some sphagnum moss on the top helped until it had a good carpet of green moss established.

Those cuts should mostly heal this year. After leaves fall, you can make more pruning cuts to eliminate too-heavy branches.
 
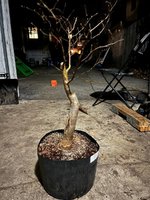
Thanks. Attached is another pic and one with the proposed lower cut.
 

Attachments

  • SM.jpg
    SM.jpg
    431.3 KB · Views: 208
  • SM_LI.jpg
    SM_LI.jpg
    430.1 KB · Views: 262
Plant it in a shallow wood box in the spring, arranging the roots radially, and let it grow this year. I use akadama, some use kanuma
I prepared a 15x15x3.5” box for the stewartia and was thinking about mixing kanuma with fir bark 70:30.
 
As for your tree, I'd consider removing the large straight trunk at the back and turning it about 30-60ºCW (or 180º from that).
Assuming the base is good from the front shown in this photograph, I would make 2 cuts:
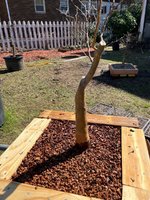
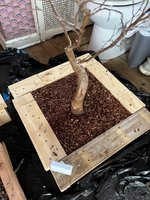
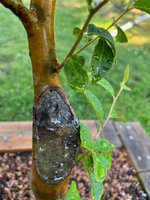
I got a chance to make the cuts last night. Had some second thoughts about keeping the straight branch, but opted to ultimately remove it and follow the advice given. I think it looks great and am excited to see it progress. Attached is a pic (I will try to take some better ones in the daytime over the next few days). It was repotted as well into 60% monto clay and 40% fir bark. Any comments/critique on the cut would be appreciated. I wasn't sure if I could remove the "ledge" created at the top of the cut where the larger trunk was removed, so I left it. The collar of the branch that remains is right at the edge of that ledge and I didn't want to cut into it (figured the new leader would grow out and the ledge would disappear?).
 

Attachments

  • SM2.jpg
    SM2.jpg
    261.2 KB · Views: 266
Do you own decent knob or concave cutters? If so you are going to want to clean those chops up. Cut back more flush to the trunk and cover the edges of the cut with some type of cut paste or wound sealant. This will ensure that when the tree starts to heal over, the callosuing bark will look closer to natural. Not sure as to how deep you should make your concave cuts if at all, as I don’t know how Stewartia tends to callous. @Brian Van Fleet will know better than I for the apecies.
 
Do you own decent knob or concave cutters?
Yup. I treated myself to a decent pair a few weeks back after breaking a few cheaper ones last season. I did apply some of the green cut paste to the wounds (it did not have sap flowing like when I cut a maple). I figured I would need to clean up the bigger cut, but held off for some guidance. I'll wait for others to chime in about the correction and timing thereof, but assuming this was a maple what would you do?

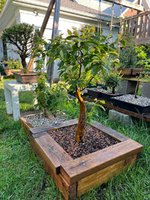
I ended up potting him in a different pot than the one I described above as it was too shallow at 3.5" inches. I think I did a decent job getting the root ball cut shallower, but it still needed something a little bigger. So I put him in a 14X14X5" box, which allowed me to put almost 2" of soil under the tree. I cut all the roots to about the same size and there is a decent amount of roots left. I'll try to post some pics of the nebari as I liked what was going on under the soil (other than the large chunks of clay).
Maples do not live here in New Mexico. If they do they are tortured by the heat! Regardless though, I would cut back both chops either flush or concave to the trunk.
 
either flush or concave to the trunk.
Sorry for being dense, but is your suggestion something like in the attached pic?
 

Attachments

  • InkedSM2_LI.jpg
    InkedSM2_LI.jpg
    267.7 KB · Views: 247
I’ve been asking around and some familiar with stewartia have suggested that the cut not be made concave and, if the branch collar is in the way on the top of the cut, to leave it be for now. There’s probably 1/8th of an inch between the cut and the collar so I don’t believe I have any more room to cut there. I’ll leave it be for now until someone chimes in.
An alternative could be to increase the angle of the cut (which would make the wound much larger).
Ideas?
 
Well, you know what they say about idle hands. I revised the angle of the cut.
 

Attachments

  • revised SM.jpg
    revised SM.jpg
    364.7 KB · Views: 211
Attached is a more flattering angle (in my "outhouse" for the weekend freeze).

Last pic made me want to throw the tree in a wood chopper. This one makes me feel somewhat better. Let's see how that giant wound I made heals. He'll be going back outside for the season as soon as I get home today.
 

Attachments

  • SM3.jpg
    SM3.jpg
    277.2 KB · Views: 214
Im gathering from the silence that I butchered this tree?
 
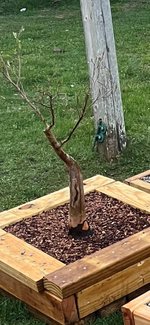
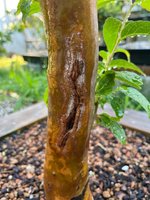
A little update. I (once again) fixed the chop. I think this is more in line with what folks were describing and it looks more natural. The wound is huge though. What's cool though is that gash on the side seems to be healing itself quickly and I am holding out hope that this guy will heal much faster than a maple. It's otherwise back budding fairly profusely and leaves are opening.

I'm still trying to figure out the watering for this tree. It's in 40% fir bark so I thought it would stay wetter longer. Seems to drink up the water pretty fast.
 

Attachments

  • SM4.jpg
    SM4.jpg
    168.9 KB · Views: 195
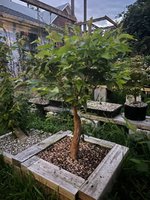
It's been a bit since I updated this thread. The tree is healthy and growing well, although I'm stuck on how to proceed design-wise. The tree has pretty awesome healing properties. The massive gash on the side of the tree is closing up nicely. I wouldn't be surprised if this is invisible by the end of next season. Even my awful trunk cut is rolling over nicely (this one will take some time to fully heal). Otherwise the tree is growing and back budding. I've trimmed the branches back slightly once, but otherwise have done no additional work to this tree since the end of winter.

Still not sure about the angle of the trunk, as the portion above the cut seems to be on too large of an angle for this tree. My initial thoughts are to re-plant the tree on better angle next season so that the leader is facing a little more upwards. Any guidance on design is appreciated.
 

Attachments

  • SM5.jpg
    SM5.jpg
    191.1 KB · Views: 162
  • SM6.jpg
    SM6.jpg
    377.1 KB · Views: 144
  • SM7.jpg
    SM7.jpg
    200.1 KB · Views: 165
I've simply let the tree grow out this season. A few branches will get wired, keeping in mind that the tree will be replanted on an angle next year. I don't really like any of the thicker branches currently making up the canopy and plan to start pruning them next season to make way for new branching.

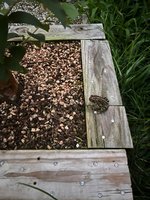
In the interim, at least the toad is keeping watch.
 

Attachments

  • SMjuly.jpg
    SMjuly.jpg
    255.4 KB · Views: 140
  • Toad.jpg
    Toad.jpg
    241.7 KB · Views: 212
Back
Top Bottom