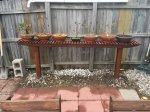
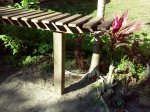
Hoping for bench-designs that have 1x1" or 1x2" bars as the 'table-top' (perpendicular to the table)

SU2

Omono
Messages
1,322
Reaction score
379
Location
FL (Tampa area / Gulf-Coast)
USDA Zone
9b
This is a very very common form of making tables and I'm astounded that 'bonsai bench' on google-images isn't giving me a good picture...the 'table-top' of the bench would look like this:
a.jpg

However those top-slats would be thinner (I've bought 40' of 1x2" for what I plan to make), and they'd be supported by (2) horizontal joists (2x4"s ---> 2x8"'s, depending on the length of the table/bench) said joists would run horizontally, parallel to each other, and be bolted/screwed into a pair of in-ground 4x4"'s (also, the ends of the horizontal joists would have the bottom-half of the last 1/5th of each end cut upward at a slight slope - I've seen this exact setup so many times and am astounded I can't find any pics googling, in fact a poster here has *exactly* what I'm trying to emulate here but I cannot find the thread...)

I'm unsure how long the 'table-top' slats should be (in length), and the proportion of the width to the length (or even the spacing between the 1x2"s that make up the top...), I could do an ok job just trying it myself but would greatly appreciate pics/links/descriptions if anyone has any to share!! I always do things like this and then there's a thousand things I wish I could've done differently, really hoping to nail this the first time as it's my first time buying wood for a project lol I always work with what happens to be on-hand and I bought this stuff just to make a specific type of bench/table! Thanks for any tips/help!!
 

SU2

Omono
Messages
1,322
Reaction score
379
Location
FL (Tampa area / Gulf-Coast)
USDA Zone
9b
Thanks for the link :) And yes absolutely! It was only in the past several months that I finally started getting my bonsai off the ground, when I started I made a pretty low bench (around the height of the pictured one in post#1) despite being told to build higher - I've got several benches now and every single one was taller than the one before it!! The last one is the ideal height I think, the top is just above my waist :)

this is mine. the top slats are 1x2's 15 inches long eachView attachment 171870
That is the exact design I'm trying to make here (except my 4x4"s have sharp corners), thank you so much for posting that helps a ton I mean just the picture lets me get an idea of the angle I need to cut on the edges of the horizontal beams :D

I've sunk 4x4's for another table so know depth and height but some things I'd be very interested to know your approach to- how far apart are your 1x2"s? Am trying to decide on table size(s) based around the lumber I have, 10' won't go far at that tight a placement so think it'll be 1 small table (or 2 real small ones, the type that only need (1) 4x4 each for support) but would be interested to know the precise mm/" spacing you've used there as that's exactly how I want mine to come out! For securing/fixing everything, I'm planning to use 3" construction-grade screws through the 2x4's (or 2x6"s - it looks like 2x4's in your pic?) to secure them to either side of the in-ground 4x4"s, and then use (2) screws for each 1x2" top-slat, probably 1.25"s (have them on-hand, do you think I need to get 1.5"s? I feel like 1.25 is fine if I sink them a little which I'd do regardless..), one screw into the center of each 2x4" through a pre-drilled pilot holes. I'll be making the tapered-ends on the 2x4"s with just my circular saw, a couple clamps and the best precision I can muster lol, will put painters'-tape along the line first to be sure... Was also planning to use the flap-disk on my angle-grinder to smooth every rough edge (every slat and all the supporting beams), assemble everything and then paint a stain on - starting to think it may be smarter to stain first, so the wood gets full coverage...dunno, guess it probably doesn't matter much, it's FL and it's going to be a limited life regardless!

Thanks a ton for posting that pic, and for any further info you can give! Great job btw, that looks excellent :D
 
Messages
130
Reaction score
228
Location
Virginia
USDA Zone
7b
Thanks for the link :) And yes absolutely! It was only in the past several months that I finally started getting my bonsai off the ground, when I started I made a pretty low bench (around the height of the pictured one in post#1) despite being told to build higher - I've got several benches now and every single one was taller than the one before it!! The last one is the ideal height I think, the top is just above my waist :)


That is the exact design I'm trying to make here (except my 4x4"s have sharp corners), thank you so much for posting that helps a ton I mean just the picture lets me get an idea of the angle I need to cut on the edges of the horizontal beams :D

I've sunk 4x4's for another table so know depth and height but some things I'd be very interested to know your approach to- how far apart are your 1x2"s? Am trying to decide on table size(s) based around the lumber I have, 10' won't go far at that tight a placement so think it'll be 1 small table (or 2 real small ones, the type that only need (1) 4x4 each for support) but would be interested to know the precise mm/" spacing you've used there as that's exactly how I want mine to come out! For securing/fixing everything, I'm planning to use 3" construction-grade screws through the 2x4's (or 2x6"s - it looks like 2x4's in your pic?) to secure them to either side of the in-ground 4x4"s, and then use (2) screws for each 1x2" top-slat, probably 1.25"s (have them on-hand, do you think I need to get 1.5"s? I feel like 1.25 is fine if I sink them a little which I'd do regardless..), one screw into the center of each 2x4" through a pre-drilled pilot holes. I'll be making the tapered-ends on the 2x4"s with just my circular saw, a couple clamps and the best precision I can muster lol, will put painters'-tape along the line first to be sure... Was also planning to use the flap-disk on my angle-grinder to smooth every rough edge (every slat and all the supporting beams), assemble everything and then paint a stain on - starting to think it may be smarter to stain first, so the wood gets full coverage...dunno, guess it probably doesn't matter much, it's FL and it's going to be a limited life regardless!

Thanks a ton for posting that pic, and for any further info you can give! Great job btw, that looks excellent :D

Thanks! I spaced the 1x2’s the width of a 1x2. I placed the first one on and then put one on its side the laid the next on and continued down the line. So I guess that makes them about an inch apart. I used 2x4’s. They are 8 feet long. For the angle, I measured down 2 inches on the edge of the 2x4 and then 8 inches along the side, marked and cut. I used my jigsaw and followed the line. I did that just for decorative purposes. I used a router on the edges just for looks also. Materials were 2 8ft 2x4’s, 1 10 ft 4x4, and I think I bought 15 6 foot 1x2’s.

I stained everything first and then I assembled. For assembly, I laid the 4x4 flat and sandwiched it between the 2x4's and then screwed on the 1x2's. The top of the bench is held on by 4, 2-inch screws on the top. The stain I used was calbot brand australian timber oil. It sealed it up pretty good.
 
  • Like
Reactions: SU2

SU2

Omono
Messages
1,322
Reaction score
379
Location
FL (Tampa area / Gulf-Coast)
USDA Zone
9b
Thanks! I spaced the 1x2’s the width of a 1x2. I placed the first one on and then put one on its side the laid the next on and continued down the line. So I guess that makes them about an inch apart. I used 2x4’s. They are 8 feet long. For the angle, I measured down 2 inches on the edge of the 2x4 and then 8 inches along the side, marked and cut. I used my jigsaw and followed the line. I did that just for decorative purposes. I used a router on the edges just for looks also. Materials were 2 8ft 2x4’s, 1 10 ft 4x4, and I think I bought 15 6 foot 1x2’s.

I stained everything first and then I assembled. For assembly, I laid the 4x4 flat and sandwiched it between the 2x4's and then screwed on the 1x2's. The top of the bench is held on by 4, 2-inch screws on the top. The stain I used was calbot brand australian timber oil. It sealed it up pretty good.

Was really hoping you'd reply while I was off working, all afternoon was hoping because I'd like to build mine today :D Don't have the stain yet but am just going to do it the 'wrong' way (once assembled - the unreachable spots will just have to deal w/o coating but my slats aren't PT lumber so they're not going to last that long anyways....I already doubt I'll trust any of my larger specimen to this table!), thanks for the prompt reply!!! I was thinking that myself, that it'd be simple to just use the next slat as the spacer, glad to hear that's how yours was done to come out looking just perfect like that! So your table uses around 55' of slats (counting (44) of them at 15" apiece), I was just guessing in the store and just got (4) 8' lengths so 32', I couldn't make as-long a table as you have... I don't think it'll be much shorter though, am hoping to hear your thoughts on this idea I have - for it to be proportional to some degree, you'd use longer slats on a longer table, shorter slats on a shorter table - so my logic was that, if I did the math and couldn't replicate what you have (that's literally exactly what I'd pictured, except for stain color lol, although that's just because I haven't chosen color yet :p ), then I'd simply do math based on 14" slats, then on 13" slats, to see what slat-length//table-length ratio I can do with my 32' of 1x2" (I don't drive so getting lumber is very difficult for me, I finally had a chance to get these 1x2"'s so I could build the bench I always pictured and not just what on-hand lumber allows!)

Do you think it's a big mistake to build w/o having the stain yet? I'm in a humid area and expect the slats (non-pressure-treated) to fail pretty quick anyways, the structural pieces are PT so figure when the slats go I'll just get another batch!

Do you think that, if careful, I'll be ok to make those angled-ends with just a circular saw? I'm pretty good with one, and have clamps/table to do it.

Why did you build it before setting it in the ground? I'd have approached it by putting the 4x4's in-ground, then affix the 2x4's to it, then put the slats on - want to make sure there's nothing wrong with that approach! I did it that way for my last in-ground table, but instead of the 4x4's being sandwiched by 2x4's, I simply ran a 4x6" across the top of the 4x4's (and used 2x6's for the slats - came out OK:
19700119_132505.jpg

And just to be clear, you mean you used (4) 2" screws downward through each of the 1x2" slats? So each slat has two screws going down into each of the 2x4"s? I've got a limited amount of 1.25"s or 1.5"s on-hand, I know it's not ideal but with sinking them I think it'll work-out, will see and if not will wait til I go get the stain...would just like to be sure I fully understand what you've done because your table isn't *like* what I'd sought to build it's literally the exact thing :)
 
Messages
130
Reaction score
228
Location
Virginia
USDA Zone
7b
I don’t think it would be an issue to assemble it before staining. I built a bench that way for my patio a few years ago and it is still in great shape. I placed the 4x4’s in the ground first and then put the top on it. If you have some time I can go out tomorrow morning and take some photos so you can see how I did it. That way what I am talking about can be a little more clear. I used 2 inch screws because it is what I had on hand from working on the house. I would imagine what you have would work just fine. ILl put some pics up tomorrow morning
 
  • Like
Reactions: SU2

SU2

Omono
Messages
1,322
Reaction score
379
Location
FL (Tampa area / Gulf-Coast)
USDA Zone
9b
Does anyone know the user who has benches of this style, only instead of just one he/she has multiple benches, some regular (long) ones like the one in this thread, others that are single-pole / smaller top....they'd shared these with me in a thread and I've looked through every thread I've started and it wasn't one of those, and gmail deletes emails >30d (if sent to trash, as I would've after responding)

The guy/girl's property is nice, like in the background you can tell it's a 500k-1M neighborhood, the stands themselves are a charcoal/grayish color iirc... if anyone knows the user or thread it'd be greatly appreciated!! (hell, just pics of Manmountain526's style table, only the 1-leg shorter-table versions, would be appreciated! I do best working off pictures, not just graph paper and mental-images of what it'll turn out like!)


I don’t think it would be an issue to assemble it before staining. I built a bench that way for my patio a few years ago and it is still in great shape. I placed the 4x4’s in the ground first and then put the top on it. If you have some time I can go out tomorrow morning and take some photos so you can see how I did it. That way what I am talking about can be a little more clear. I used 2 inch screws because it is what I had on hand from working on the house. I would imagine what you have would work just fine. ILl put some pics up tomorrow morning
I do have the time, I got held-up on the decision over assembling before staining and didn't do it today (think it was analysis paralysis, I really want to find some pics of that style table but shorter and 1-legged, as I'm thinking my ideal here is to have 1 like yours and 2 or 3 single-legged ones (with maybe 2.5' long tops and 12" long 1x2' slats)


Yeah man that'd be hugely appreciated, thanks a ton for this it's truly appreciated :)
 

SU2

Omono
Messages
1,322
Reaction score
379
Location
FL (Tampa area / Gulf-Coast)
USDA Zone
9b
Before I begin I've just gotta ask why the heck lumber comes in such imprecise sizes? Everything I thought was 1" thick was either .75 or ~.80", everything I thought was 2" wide was 2.5" wide....yet the lengths, they're precise, 8' lengths were to the 1/16th...please tell me there's some practical rationale and that this isn't some silly cultural artifact (like miles instead of kilometers, or hogs heads to a furlong instead of whatever the hell unit that is :p )


I wanted to say thanks again for the link, very very helpful through my last-minute confusions!!


If you haven't already, please don't - they'd still be useful but it's probably easier for me to give quick summary/pics of my build and ask what I may've done better (spent almost 5hrs, am embarrassed to say!)

Anyways I did it as an 'xmas present' to my atheist-self today, spent ~5hrs on the 'traditional' bench (almost exact replica of yours, only I didn't use the 1x2's I used 1x3's, which are really .75x2.3....still have the 32' of "1x2"", and will be building 1 more bench with it), and another 3hrs building 2 more 'benches'(/monkey poles), 3' long apiece (with same "1x3" slats as table-top), each with (1) piece of driftwood for support (and a 2x4" laid horizontally along the top to support the slats) The (2) monkey-pole benches are flanking the main bench (at uneven heights, so 3 new shelf-heights altogether :) ), even un-painted and w/o specimen it looks cool, am letting the silicone dry and will be filling them tonight and get some pics once the sun's up tomorrow but am so psyched with how they came out, thanks again for the help I was able to get exactly what I wanted due to it :D I put some decorative-grass (mondo grass?) clumps at the bases of the poles, looks good and will look great once painted!!
 
Messages
130
Reaction score
228
Location
Virginia
USDA Zone
7b
I am glad that you got things going. I am happy you were able to build it. Put those pics up and be proud of what you did. No need to feel embarrassed about the time. It took me about the same to put my together and get it put up. For the lumber issue I have no idea why the cut them the way they do. Length is what it says but the rest is always 1/2 inch shorter than what it is described, i.e. 2x4 is really not 2x4
 
  • Like
Reactions: SU2

GrimLore

Bonsai Nut alumnus... we miss you
Messages
8,502
Reaction score
7,453
Location
South East PA
USDA Zone
6b
Before I begin I've just gotta ask why the heck lumber comes in such imprecise sizes? Everything I thought was 1" thick was either .75 or ~.80", everything I thought was 2" wide was 2.5" wide....yet the lengths, they're precise, 8' lengths were to the 1/16th...please tell me there's some practical rationale and that this isn't some silly cultural artifact (like miles instead of kilometers, or hogs heads to a furlong instead of whatever the hell unit that is :p )

Here is a chart that will help you in the future. Common standards is all ;) -

lumber_finish_-size_chart.gif

Grimmy
 
  • Like
Reactions: SU2

SU2

Omono
Messages
1,322
Reaction score
379
Location
FL (Tampa area / Gulf-Coast)
USDA Zone
9b
I am glad that you got things going. I am happy you were able to build it. Put those pics up and be proud of what you did. No need to feel embarrassed about the time. It took me about the same to put my together and get it put up. For the lumber issue I have no idea why the cut them the way they do. Length is what it says but the rest is always 1/2 inch shorter than what it is described, i.e. 2x4 is really not 2x4
Thanks :) I was worried about making clean angles for the edges of the 2x4"s but all (4) cuts went perfectly, it's un-painted (black for the wood, clearcoat for the driftwood) still but am in love with these benches!! Proper 8' bench at 34" and 'monkey pole benches' (3' long each) at ~28" and ~23" heights, kind of a 3-tiered thing (I think that effect will be cooler once painted, especially since I'll be painting all my other benches the same color, it'll finally be a full 'fence' of bonsai benches all in 1 color, should be a cool effect!!)
19700331_203044.jpg
19700331_173705.jpg
 

SU2

Omono
Messages
1,322
Reaction score
379
Location
FL (Tampa area / Gulf-Coast)
USDA Zone
9b
Could anyone give me a guess on how much paint to get? I've got this new 8' bench and the (2) new 3' benches, then (2) more 8' benches and (1) 6'....34' feet of benching, and I'll just be painting half of it (ie the visible halves, I almost painted some before building and am glad I did not because I'd forgotten that you want it to breathe, I've seen so much paint go bad when wood was thought to be fully-dried and then sealed, I don't think I'd ever paint in FL w/o leaving breathing-areas if able to! So I'll be doing the fronts/sides of the 4x4 legs, not the rear that I don't see; the tops&sides of the slats, not the bottoms, etc etc

I know what my guesstimate is for total paint needed but would reallllly love to hear some guesses from others so I don't grossly-miscalculate this!! I just got a container of a matte charcoal, am going to do a round of paint (just a small-ish area) and if I like it I'll get it matched for more (if needed), if it's too charcoal I'll get black and mix 50/50 :)
 

SU2

Omono
Messages
1,322
Reaction score
379
Location
FL (Tampa area / Gulf-Coast)
USDA Zone
9b
NM paint is half-done and coming out great (this is the only site I can think of where there's a limited time-window to edit/delete posts :p )
 
Top Bottom