You are using an out of date browser. It may not display this or other websites correctly.
You should upgrade or use an alternative browser.
You should upgrade or use an alternative browser.
Forest's from 20+ years ago
- Thread starter Bolero
- Start date
ghues
Omono
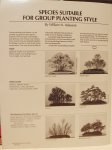
Maybe we can use this thread to discus forest designs? Looking at those photos and reviewing other classic forest design principles .......which usually show the exact location (maybe approximate?) of each tree, i.e. Depending on the view (close up or distant) they show the position of the main (dominate) tree, then the co-dominate trees then the secondary and finally the smallest (usually around the outside). The inter-tree distance is usually irregular in order to be effective visually.
However are there any examples of a more structured forest?, as in the managed stands that we have all over the globe whereby the intertree distance is very consistent and where that average distance falls with a reasonable or acceptable standard deviation? Just wondering as they may look visually awkward......please post your forests.
G.
Last edited:
Rusty Davis
Shohin
View media item 3036View media item 3035 here is my brand new one. I will spend the winter trying to figure out my direction. I like the thought of a literati style forest
Wilson
Masterpiece
Good call by both of you to get a conversation on forest design. I believe as you asked @ghues there are many different ways to portray a group planting, not just wild forests. To recreate maintained landscapes seems like an enjoyable design as well. The more people produce, and try different approaches, the easier it gets to imagine new designs. I have been more attracted to chinese bonsai and penjing, because I find the approach more open/natural in the acceptance of different design.
ghues
Omono
@Rusty Davis - nice start, for discussion purposes perhaps you can elaborate on how you came up with this design?
Rusty Davis
Shohin
No I can't lol it basically fell in my lap a week ago. I have no history on it. I've seen a few pictures of Forest/ group/ clump plantings that inspired me and had the opportunity to get this. It is my first forest and I'm new to bonsai. I look at it and can see a literati forest but I need to fix the right side for that. A literati forest may not appeal to the masses but... I do this for me. I do like to hear others thoughts
Rusty Davis
Shohin
It's 34" high by 40" long. I like the some what whimsical look to it. With maintaining the triangular foliage and working the individual trees I think I could get a look as if someone was walking across a field up to a forest
sorce
Nonsense Rascal
I do like to hear others thoughts
You know what I been thinking...?
I think I understand what you mean by "literati forest", I'm sure it's just semantics, but I can't shake someone's words in my head saying something to the tune of......
The place a Literati tree grows is not in a forest.
So literally.....
I would start at the bottom finding a place for each branch to go, wire each and every branch into position.
I would only cut off stuff that Looks to "placed", "unnatural"....after wiring the whole thing out.
If by literati, you actually meant cutting most of the branches off....
Anyway...find one of the 10,000 posts by Adair with the Colin Lewis wiring tutorial, watch it....and try your best to wire it ALL correctly.
I always look at this picture which I saved to my phone too...

Pictures.

That is a really wicked group.
Love it!
Sorce
Wilson
Masterpiece
@Rusty Davis I hear you on the literati group planting. To me it can be wholly natural when you hike in high mountain zones. Most trees in the krummholz zone of mountains are battered tough trees, holding on for dear life. As you put it, you do this for you, so enjoy your journey! Just share the progress with us!")
Rusty Davis
Shohin
@sorce thank you for posting those I won't looking for them the other day. I used them on my contest tree.
I do get what your saying I'd did some picture hunting found a few traditional juniper forest that spoke to me but not many.
As for what I see as possible if you have the literati style pending book by Zhao Qingquan on page 131 there is a right up on a Sargent juni. I love that look and can see something to that effect in this. I am naive about alot of shit though lol
Rusty Davis
Shohin
@Wilson I will do my best how ever it leads me and share all I can. The forests around me are so mixed and Hodge podge I can't use them for inspiration but walking in the deep pine woods of southern Missouri they where tall skinny and didn't have much foliage except the top 6th of the tree. Was beautiful though.
Rusty Davis
Shohin
I would still like to see what others are doing and what there thought process is
michaelj
Chumono
I remember those wiring illustrations from back in the day. I never really figured out why figure 3 was so great and figure 7 was so wrong. The only difference I see is how far apart the two co-wired branches are.
mattspinniken
Omono

I tried to follow the rules on this forest that I put together. At the time I put it together (spring 2016) I had not studied forest much and there are some things I would change now but I like it. I added 3 small trees all near the outside this spring that will need to grow into the design a bit. This thing took a long time to wire and I really only wired the primary branches. The pic is not great but its pretty heavy to try and carry around by myself for a better background. Any tips are appreciated.Maybe we can use this thread to discus forest designs? Looking at those photos and reviewing other classic forest design principles .......which usually show the exact location (maybe approximate?) of each tree, i.e. Depending on the view (close up or distant) they show the position of the main (dominate) tree, then the co-dominate trees then the secondary and finally the smallest (usually around the outside). The inter-tree distance is usually irregular in order to be effective visually.
However are there any examples of a more structured forest?, as in the managed stands that we have all over the globe whereby the intertree distance is very consistent and where that average distance falls with a reasonable or acceptable standard deviation? Just wondering as they may look visually awkward......please post your forests.
G.
Brian Van Fleet
Pretty Fly for a Bonsai Guy
I really like how all the trees relate to one another. Good movement and placement. First glance, I'd add another small grouping in the back, just to the left of where you can see the outlet. Fill in the hole left between the two largest trees up front. I'll be eager to see this one come along.
mattspinniken
Omono
Thanks Brian, I totally agree with your thought on adding a small grouping into the gap off to the left. I have been thinking about closing that gap some visually in the future.I really like how all the trees relate to one another. Good movement and placement. First glance, I'd add another small grouping in the back, just to the left of where you can see the outlet. Fill in the hole left between the two largest trees up front. I'll be eager to see this one come along.
Once the apex's put on more growth I will try and put in some more cohesive movement to all the trees.
VAFisher
Masterpiece
Here is my first forest. I wanted to try a red maple (acer rubrum) grouping because they are so common around me. I started by grouping several small trees together in different pots and letting them grow together for a while.

One of the problems I had with this approach was that the roots weren't very compact. I think I would have been better off growing them singly for enough time to get very compact root balls which would allow more freedom in placing their positions. As it was, I had long roots with feeders far away from the trunk that I couldn't cut off - so I had to wind roots around each other and try to fit the trees in like a jig saw puzzle. It ended up coming together kind of how it fit as opposed to how I really wanted it. In some of the picture demonstrations in books and online, it shows trees with tiny little rootballs that can be plopped down in the pot wherever the creator needed them. It didn't work so neatly for me. This also contributed to the big mound of soil I had to create.
When I got them all together in a bonsai pot, I looked at it for a couple days and realized it needed more. I didn't have any more red maple seedlings to add to the group so I decided to add sweetgums instead and ended up with this mixed planting. Somewhere I have a picture of it before I added the sweetgums but I can't seem to find it right now.

For now, I've settled on the design and this is what it looks like this year.


My next step is to work on branching and ramification to see if I can reduce that leaf size. I'm also hoping that if I let it get nice and pot bound that will help also. It won't get repotted for a while but when it does, I'll work on reducing the mound. It looks even worse now because the moss has gotten pretty thick.
Bolero
Omono
Very, very nice & it shows your attention to detail...
augustine
Chumono
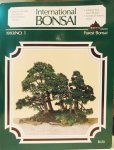
Good thread but we should not be posting articles from International Bonsai. Find the back issue and buy it, wonderful magazine.
Bolero
Omono
Good thread but we should not be posting articles from International Bonsai. Find the back issue and buy it, wonderful magazine.
I have 30 or 40 issues from the 1990's are they worth anything ???
Similar threads
- Replies
- 1
- Views
- 186