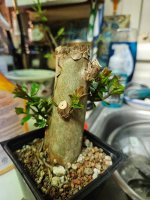
Hey Everyone, I recently got my hands on my first Crepe Myrtle and I am looking for some advice on styling this one. I left lots of the existing branches, but the question would be, to chop or not to chop them off? Not sure how well myrtles will do with chopping back all the main branches to allow for new branches to develop. Any suggestions would be welcome here.
Crepe Myrtle Styling
- Thread starter pablo
- Start date


Deep Sea Diver
Imperial Masterpiece
That’s a big honking beginning.
Generally react pretty good if cuts are sealed and aftercare is solid.
There are quite a few decent bends and turns down low to springboard off of.
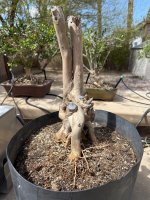
Image #3 on the right side shows a really nice three level tapered start. The base curve, up the front branch going sorta towards the viewer (dead top) and off to the left…. Along with the front branch with a nice curve down low going towards the left. Likely one of the ones in the rear would add to the composition.
So only one possibility to get you started.
Cheers
DSD sends
Generally react pretty good if cuts are sealed and aftercare is solid.
There are quite a few decent bends and turns down low to springboard off of.
Image #3 on the right side shows a really nice three level tapered start. The base curve, up the front branch going sorta towards the viewer (dead top) and off to the left…. Along with the front branch with a nice curve down low going towards the left. Likely one of the ones in the rear would add to the composition.
So only one possibility to get you started.
Cheers
DSD sends
Thanks for the advice! @Deep Sea Diver , yeah this is a big one. I just attached a picture, is this what you mean?
Attachments

Deep Sea Diver
Imperial Masterpiece
Perhaps this as a conversation starter….

The hatchmarker root may be able to be removed over time
Remember this is only one side!
Cheers
DSD sends
The hatchmarker root may be able to be removed over time
Remember this is only one side!
Cheers
DSD sends
Last edited:
BrianBay9
Masterpiece
These guys air layer very easily, and cuttings root easily too. Don't throw away the stuff you remove!
Baron von Smoogle
Sapling
This is a 1.5" diameter chunk that I potted into Turface and Pumice 3 weeks ago. It has been indoors, under lights. All I have done is keep it watered..........Not sure how well myrtles will do with chopping back all the main branches to allow for new branches to develop. Any suggestions would be welcome here.
I think yours will do well just cutting off the branches.
Attachments
Ah gotcha. This would be the idea getting rid of a lot of that front part to make more movement towards the back. Thanks for the advice!Perhaps this as a conversation starter….
View attachment 590427
The hatchmarker root may be able to be removed over time
Remember this is only one side!
Cheers
DSD sends
Ah gotcha. I unfortunately scrapped some of the material already since I didn't want to bother with trying to see if it would root. If I make some more cuts I'll for sure try putting in soil!These guys air layer very easily, and cuttings root easily too. Don't throw away the stuff you remove!
Desert O'Piñon
Chumono
I'm interested to see what you've done with it so far, as in, what cuts have you made? These actually grow here, so I want to try one myself someday.
Thanks everyone. I got my answer on how well these bounce back. I took a leap and did some bold moves on this one. Be letting this one do some new growth and work with the new growth to develop new branches. Propogating what I cut off too!
Attachments


SeanS
Omono
- Messages
- 1,728
- Reaction score
- 5,894
- USDA Zone
- 9b
If it were my tree I’d reduce those 2 trunks that you’ve left as well. I’d probably take one off completely and shorted the remaining one considerably, probably to around an inch high. It should explode with loads of new buds all over the place which you can use to grow branches and hopefully the next section of trunk.
SeanS
Omono
- Messages
- 1,728
- Reaction score
- 5,894
- USDA Zone
- 9b
Boon just shared this blog post on FB

Crape Myrtle Progression Series
Please enjoy this wonderfully aged Crape myrtle over its decade plus long bonsai journey. This blog post will mainly be a photo essay with just a few interjections. An important note at the outset, this tree took much longer to bonsai than necessary and I'm eager to express my gratitude for the...
www.newworldbonsai.com
leatherback
The Treedeemer
Glad to see this. I saw a provocative suggestion from @Deep Sea Diver and wondered..Thanks everyone. I got my answer on how well these bounce back. I took a leap and did some bold moves on this one. Be letting this one do some new growth and work with the new growth to develop new branches. Propogating what I cut off too!
Why would you make such big cuts. So happy you opted for using the higher trunkline option here!
I collected a handfull of branches last year and rooted match stick cuttings so.. I am breathing down your neck trying to get material like this hahahaha! But seriously following as this is a rare species on the forum and I have no idea how they grow, as they are seldom seen here.
Saw this, looks awesome!Boon just shared this blog post on FB
Crape Myrtle Progression Series
Please enjoy this wonderfully aged Crape myrtle over its decade plus long bonsai journey. This blog post will mainly be a photo essay with just a few interjections. An important note at the outset, this tree took much longer to bonsai than necessary and I'm eager to express my gratitude for the...www.newworldbonsai.com
I kept a bunch of material to root on this one. I’ll share if they root up!Glad to see this. I saw a provocative suggestion from @Deep Sea Diver and wondered..
Why would you make such big cuts. So happy you opted for using the higher trunkline option here!
I collected a handfull of branches last year and rooted match stick cuttings so.. I am breathing down your neck trying to get material like this hahahaha! But seriously following as this is a rare species on the forum and I have no idea how they grow, as they are seldom seen here.
Agreed. I was eyeing those two and figured I should cut them down. I’ll probably cut one off down to the point of where they connect to make 1 branch. I’ll update pics once I do so. I’ll definitely try and keep the piece I cut to see if it roots for another project. Thanks for the advice!If it were my tree I’d reduce those 2 trunks that you’ve left as well. I’d probably take one off completely and shorted the remaining one considerably, probably to around an inch high. It should explode with loads of new buds all over the place which you can use to grow branches and hopefully the next section of trunk.
Orion_metalhead
Masterpiece
Perhaps this as a conversation starter….
View attachment 590427
The hatchmarker root may be able to be removed over time
Remember this is only one side!
Cheers
DSD sends
This was my first thought as well, even before DSD pointed it out. But its a bit cliche of a shape/style, so Im curious what you do with the current decision to gp with the other branches.
In landscape, crape myrtle develop a fountain-style canopy when properly pruned.
SeanS
Omono
- Messages
- 1,728
- Reaction score
- 5,894
- USDA Zone
- 9b
Some advice on cut paste usage if you’d like my take. Unless you’re making the final cuts that you want to heal over don’t waste your putty cut paste, rather use a liquid style cut paste. You’re going to be cutting those stubs/branch ends off eventually once you have some new shoots growing so there’s no need to use a putty style paste at this point.
It’s much easier to just goop some liquidy paste on the ends of big cuts to get them sealed initially.
It’s much easier to just goop some liquidy paste on the ends of big cuts to get them sealed initially.


Similar threads
- Replies
- 7
- Views
- 1K