Acer Palmatum ‘Nishiki Gawa’ airlayer

  • Thread starter Deleted member 32750
  • Start date
D

Deleted member 32750

Guest
Last year I purchased 2 ’Nishiki Gawa’ rough bark maples from Mr. Maple. Obviously these were grafted trees meant for landscape, but I love the rough bark varieties of maple bonsai, so I had to try to airlayer one to start it on the path as a bonsai.

I started the airlayer sometime in May I believe, after the first flush of growth hardened off.

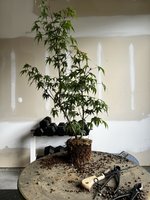
I checked the roots today and was surprised at how many roots the tree produced, so I decided to go ahead and remove the layer.

Here is a picture of the roots that were produced in approximately 1.5-2 months.
611A2475-1012-4F93-A569-616C22D3BBE8.jpeg

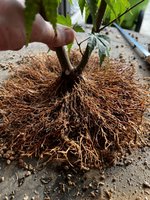
Here is a photo after teasing away the soil and sphagnum moss.
10395A30-0707-47C1-A99C-DB95F429EB6A.jpeg

This is the best result I have had with an airlayer so far. This tree now has a nearly 360 degree nebari that will eventually develop rough bark. There is one spot on the backside that may eventually need a root graft, but hopefully new roots will sprout from that area.

I think its safe to say this cultivar air layers quite easily.

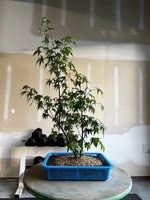
I repotted the tree into a shallow collander for now and put a small board under the tree to encourage lateral root spread. The tree was potted in Aoki blend bonsai soil (80% akadama, 15% Kiryu, 5% lava) and shredded sphagnum/green moss was placed on top of the soil over the root system to ensure moisture retention in the root zone
6D1D2AF1-701C-4528-93A2-BED90A97C797.jpeg

This tree will be fertilized generously and allowed to grow freely for the remainder of the growing season.

In winter I will begin to cut back drastically so I can build primary lines with taper/movement starting next growing season. This will be a long term project for me, but I look forward to documenting the progress for a long term deciduous project here.

Stay tuned!

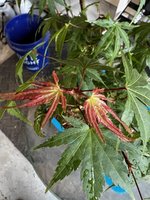
bonus photo: incredible color on the new growth!
E74004CC-8525-4709-9F84-AF191DF82075.jpeg
 

InstilledChaos

Yamadori
Messages
88
Reaction score
125
Location
Central NY
USDA Zone
5b
Very nice work. I had a very easy ‘Arakawa’ air layer this year as well, but definitely nowhere near the high quality root spread you have there! Interesting that the rough bark cultivars seem to air layer so easily.

On another note, what is your source for those shallow rectangular colanders?
 

19Mateo83

Masterpiece
Messages
3,479
Reaction score
7,736
Location
Charlotte, NC 7B
USDA Zone
7b
Holy radial roots batman!! I just separated a shishigashira air layer I started May 2nd that didn’t have a third of the roots. What media and technique do you use? That’s very impressive results!
 
D

Deleted member 32750

Guest
Wow! That root spread is amazing. Nice work!
Thank you. I think fertilizing generously with a good fertilizer with micronutrients prior to starting the layer helps a lot.
I also think the humidity in the south helps a lot too!
 
D

Deleted member 32750

Guest
Thanks. I feel confident in air layering mine next year.
Good luck! I up potted mine from the 1 gal pot into a bigger terracotta pot and fertilized generously in the spring. I think that helps a lot.
 
D

Deleted member 32750

Guest
Very nice work. I had a very easy ‘Arakawa’ air layer this year as well, but definitely nowhere near the high quality root spread you have there! Interesting that the rough bark cultivars seem to air layer so easily.

On another note, what is your source for those shallow rectangular colanders?
Ive had tremendous success with arakawa cuttings this year, but surprisingly my airlayer has been slow to root on Arakawa conpared to this nishiki gawa.

check tigerchef.com that’s where I find all my plastic colanders!
 
D

Deleted member 32750

Guest
Holy radial roots batman!! I just separated a shishigashira air layer I started May 2nd that didn’t have a third of the roots. What media and technique do you use? That’s very impressive results!
Honestly I didn’t do anything out of the ordinary. I just did the normal ring bark method and used clonex root gel and packed the long fiber sphagnum around the girdle and used aluminum foil to secure the layer. It rooted really quickly, I think two weeks after the layer was started. I attribute that to fertilization in spring with a micronutrient packed fertilizer.

once I realized it was rooted sufficiently, i took off the aluminum foil and slipped a relatively large sized nursery pot around the girdle and filled the pot with aoki blend soil around the roots/sphagnum and then put organic fert on the top of the pot to fertilize the new roots. I also drenched with fish/kelp every other week.

edit: I also started the layer directly above the graft so all the auxin generated from all of the shoots on the tree accumulated at the girdle. More auxin/sugar starch accumulation = more/easier rootage
 
Last edited by a moderator:

19Mateo83

Masterpiece
Messages
3,479
Reaction score
7,736
Location
Charlotte, NC 7B
USDA Zone
7b
Ahhh…. Ok. It’s that last step that I think I need to start doing. The slip potting with media around the sphagnum ball so I can fertilize the new roots. Nice technique, the proof is in the pictures
 
D

Deleted member 32750

Guest
Ahhh…. Ok. It’s that last step that I think I need to start doing. The slip potting with media around the sphagnum ball so I can fertilize the new roots. Nice technique, the proof is in the pictures
Yeah I think the fertilizer helps, but you definitely have to be careful not to damage the roots as you slip the pot. They’re incredibly fragile. Some people start the layer with the pot around the girdle from the beginning.
 

19Mateo83

Masterpiece
Messages
3,479
Reaction score
7,736
Location
Charlotte, NC 7B
USDA Zone
7b
Yeah I think the fertilizer helps, but you definitely have to be careful not to damage the roots as you slip the pot. They’re incredibly fragile. Some people start the layer with the pot around the girdle from the beginning.
Here’s some October glory maples I did in the root pod things.
ECB7948A-F977-4E85-B227-552D0D7E10B0.jpeg
I didn’t take a picture of the shishigashira’s roots but here’s it now. I separated it a couple hours ago.
151101A1-7084-4712-AAB2-40DD19BAD14C.jpeg
I’m definitely going to start using a mild fertilizer solution on my air layers from now on though.
 
D

Deleted member 32750

Guest
Here’s some October glory maples I did in the root pod things.
View attachment 447213
I didn’t take a picture of the shishigashira’s roots but here’s it now. I separated it a couple hours ago.
View attachment 447214
I’m definitely going to start using a mild fertilizer solution on my air layers from now on though.
Nice! I bought some of the root pods on amazon to use for next season. I find wrapping the sphagnum with foil or plastic to be incredibly frustrating some times.

I’ve heard Bjorn mention many times that shishigashira is notorious for producing roots on one side of an airlayer. I had a similar experience with a katsura airlayer. It had only two long roots on each side of the layer.
 

19Mateo83

Masterpiece
Messages
3,479
Reaction score
7,736
Location
Charlotte, NC 7B
USDA Zone
7b
Nice! I bought some of the root pods on amazon to use for next season. I find wrapping the sphagnum with foil or plastic to be incredibly frustrating some times.

I’ve heard Bjorn mention many times that shishigashira is notorious for producing roots on one side of an airlayer. I had a similar experience with a katsura airlayer. It had only two long roots on each side of the layer.
Mine produced roots on 3 sides and one way high up towards the very top. I bought my pods for the same reason. However I don’t like that you have to open them to check them and you have to pay more attention to how much water it receives. They do work well though.
 

Rivian

Chumono
Messages
894
Reaction score
739
Location
DE
USDA Zone
6
Looking good. Are the leaves a bit large? Im still compelled to get one as alternative to Arakawa

I also finished a Shishigashira groundlayer today. Radial, but quite thick roots
 
D

Deleted member 32750

Guest
Looking good. Are the leaves a bit large? Im still compelled to get one as alternative to Arakawa

I also finished a Shishigashira groundlayer today. Radial, but quite thick roots
I fertilized with osmocote plus (14N value) in spring so the leaf size here is rather large. Its not naturally this large. I have another one that I haven’t layered yet and the leaves are smaller. I find the leave shape and size to be similar to Arakawa, but there are some subtle changes.
 

Maiden69

Masterpiece
Messages
2,363
Reaction score
3,658
Location
Boerne, TX
USDA Zone
8b
Thank you. I think fertilizing generously with a good fertilizer with micronutrients prior to starting the layer helps a lot.
I also think the humidity in the south helps a lot too!
One thing that I notice you did that a lot of people miss is to have the ringbark taken right below a node. I see way to many people taking a ring bark between the nodes and placing the layer there without a node inside. Yes, they do root from there, but I have seen a lot of failures there, where I have not seen many when the node is inside the soil/sphagnum in the layer. This is where I plan on air-layering my Hubble's cork bark.
 
D

Deleted member 32750

Guest
One thing that I notice you did that a lot of people miss is to have the ringbark taken right below a node. I see way to many people taking a ring bark between the nodes and placing the layer there without a node inside. Yes, they do root from there, but I have seen a lot of failures there, where I have not seen many when the node is inside the soil/sphagnum in the layer. This is where I plan on air-layering my Hubble's cork bark.
Yes thats a good point and thanks for pointing that out. I always try to start the layer below a node whenever possible.
Another trick I started doing this year is putting a wire directly under the top cut of the ring bark to help direct roots horizontally when they form.

Good luck with you hubble’s super cork, that is a cultivar on my wishlist.
 

Maiden69

Masterpiece
Messages
2,363
Reaction score
3,658
Location
Boerne, TX
USDA Zone
8b
Another trick I started doing this year is putting a wire directly under the top cut of the ring bark to help direct roots horizontally when they form
I always use a wire, the thicker I can find, Last few times I have used 4mm aluminum wire, and make sure you twist it close. I have seen a few set up as a ring but not twisted, which a strong tree will push open easily.
 
Top Bottom